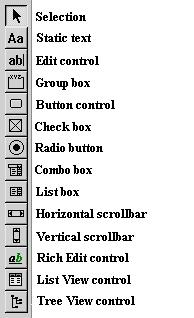
Emergence BASIC includes a unified Dialog Editor and GUI Designer. The editor is used to layout controls, text and set the attributes of a dialog. It can also be used to layout controls to be displayed in a window as Emergence BASIC uses a unified coordinate system for control placement. Once a satisfactory layout is made you can generate the source statements necessary to create the dialog or form in your program.
Creating a new dialog
Select New->Dialog Editor from the File menu. A new window will open with a representation of a blank dialog. The dialog can be saved using the File menu and selecting Save. See figure 1 for an example.
Sizing the Dialog
Click on any blank area in the dialog to show the sizing handles. Drag the sizing handles to change the dialog size.
Dialog Properties
Double click any blank area in the dialog to bring up the Dialog Properties box. Here you can change the caption, variable used and styles of the dialog. If you are creating a dialog the variable entry should correspond to the one used in your program defined with DEF ... as DIALOG.
You can also right click on any blank area in the dialog to bring up a menu to access properties, grid settings, and other common functions.
Adding Controls
Click any control button on the control bar to select a control to add. Click in a blank area of the dialog to add the control. A representation of the control will be displayed at the location clicked. See figure 2.
Moving and Sizing controls
Clicking on any control will show the sizing handles. You can drag the control anywhere in the dialog. The action toolbar contains additional control manipulation functions. See figure 2.
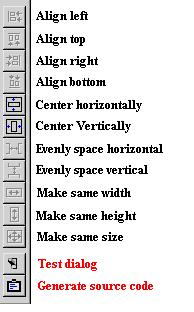
Select multiple controls by holding down the control <CTRL> key and selecting other controls with the mouse. The first control selected will be shown in a black border and all others in red. The functions on the action bar use the first selected control as a reference. Align Left for example will align the left border of all the selected controls with the first selected. The Evenly Space actions require 3 or more selected controls.
Changing control properties
Double click on any control to bring up the property box. Enter the ID of the control to be used in your program. Traditionally and ID of 1 is reserved for OK buttons and an ID of 2 is reserved for Cancel buttons. It is recommended that you use those to maintain consistency. Also closing a dialog by pressing the <ESC> key will send a control ID of 2 indicating the user wishes to cancel the dialog.
You can also right click on a control to bring up a menu to access the control properties or delete the control.
Testing the dialog
To test your dialog select the Dialog menu and choose Test or click on the test button of the action bar. If you create a dialog with no close box you can close the test dialog by pressing the escape <ESC> key.
Generating source code
Select the Dialog menu and choose Generate Source.
The source code can be copied to the system clipboard, or opened in a new window. Paste the code in your program by selecting Paste from the Edit menu. The code generated consists of the definitions for the CREATEDIALOG and CONTROL statements. In order to create a fully functional dialog in the program you need to define the dialog variable and a message handler. The following skeleton code can be used to create a functional dialog application for testing.
DEF d1:DIALOG
REM Paste the generated code from the dialog editor here
DOMODAL d1
END
SUB handler
SELECT @CLASS
CASE @IDINITDIALOG
CENTERWINDOW d1
ENDSELECT
RETURN
ENDSUB
As of version 1.2 of the IDE you can also chose to have the GUI designer create a complete skeleton handler for your dialog automatically.
Using the editor as a GUI designer
Controls can be laid out in a window as easily as in a dialog. Create the dialog as you normally would and generate the source code. Use the dialog properties box to choose the name of a WINDOW variable instead of a DIALOG one. Generate the source code and after pasting into the program of your choice delete the CREATEDIALOG statement. A window must be opened first before adding controls so the best place to place the CONTROL statements is after the OPENWINDOW statement.
To allow tabbing between controls contained in a window see the ENABLETABS function.
Figure 1. The Dialog Editor
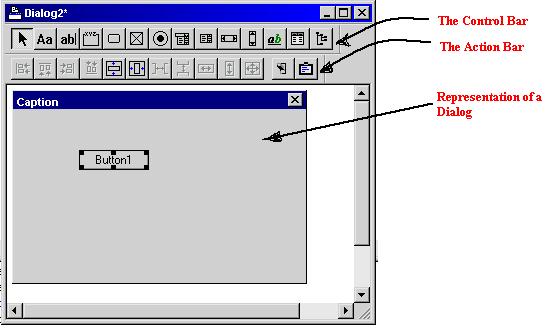
Figure 2. The control and action bars. Images may differ from current version.